Showing posts with label Device Driver. Show all posts

Monday, February 15, 2016

bench3

Fix USB Device Not Recognized Error

When you use USB devices in Windows, Windows will load and install a device driver to communicate with the new USB device. A lot of standard USB device drivers are included with Windows XP, even more in Vista, Windows 7 and 8. But if the USB device is not supported by Windows, you will see a USB device not recognized error like the one below.

Fix USB Device Not Recognized Error

You can try unplugging the USB device, waiting a few seconds and plugging it back, but chances are the error will remain.

Another error message that is common is the message Unrecognized device has been found.

When you open the Windows Device Manager from the Control Panel, you will generally see the USB device under the Other devices or Unknown devices category.

Fix USB Device Not Recognized Error 2

In case of an external hard disk, you may also get the error:

One of the USB devices attached to this computer has malfunctioned, and Windows does not recognize it.

Also keep in mind that if you don’t have the right USB drivers for your device, Windows might be using a default, compatible driver, which restricts the performance or limits the features of your USB device. This is particularly true for USB 2.0 and USB 3.0 ports.

How to fix a USB device not recognized error.

Considering the fact that in most cases the USB device driver is missing in Windows, the common solution to fixing the USB device not recognized error is to install the driver for the USB device. In most cases new USB devices come with a driver CD which contains the USB driver that needs to be installed. If you do not have a driver CD, you can try to find and download the USB device driver on the manufacturer’s website.

In case you really can not find the device driver for the USB device, you can use a driver finder program. Such a program will find and download device drivers on your PC based on the hardware that it automatically identifies. Even if your USB device is not plugged anymore, the application will be able to find and download a USB driver for it.

When you do have a driver CD, it’s still smart to use a driver update program to get an updated driver for your USB device. Drivers on CDs are quite often outdated and updated drivers can solve problems, improve performance and add features.

A second benefit to a driver finder program is that it can update all outdated drivers on your system. This means that the system or chipset drivers will also be updated, including the USB chipset drivers on your motherboard. This could also solve the USB device not recognized error, whether it is a USB 2.0 port or USB 3.0 port.

Other methods to repair the USB device not recognized error

In case the USB driver update does not solve the USB device not recognized error, there are a few other things that you can try to solve the error.

  • If your USB device is using a separate USB cable, try changing the cable to make sure the USB cable is not defective. For external hard disks that are not recognized, a shorter USB cable can sometimes help as the power voltage can be a problem in those cases.
  • If you are getting a USB not recognized error when you are trying to connect a mobile phone or MP3 player, check the configuration options on the device itself. The settings often allow the device to be configured as a Mass Storage Device, which can solve the problem.
  • Check the BIOS of your computer to make sure the USB ports are configured properly. Most new USB devices work best with the USB 2.0 configuration, but in some cases you might need to change the USB to “legacy” support, which means version 1.1.
  • Disable the power management of USB hubs on your computer. This can sometimes help with certain USB devices, especially if the problem happens with power state changes (resume from hibernation for example).
  • In the Device Manager, right-click the Universal Serial Bus controllersdevice and select Uninstall in the popup menu. Now reboot and Windows will reinstall the device.
  • In case you are using a USB hub, try plugging the USB device directly into the computer instead of in the USB hub. USB hubs often cause compatibility problems with certain USB devices. The cause can be the USB version compatibility or a USB power limitation.
  • Try shutting down the computer altogether and unplug it from the power supply. Wait for a few minutes before plugging it back again and starting it. In case you are using a laptop, also unplug the laptop battery in this step.
  • Delete the related registry key under “HKEY_LOCAL_MACHINE\SYSTEM\CurrentControlSet\Enum\USB” from the Windows registry. Each USB device has an entry there starting with “VID_”. Find the related entry to your USB device and then delete it. Make sure you make a backup of the registry before deleting anything!
    Fix USB Device Not Recognized Error 3Restart Windows and then try plugging the USB device again.
  •  
  • Specifically for Windows XP, there is another possible solution that is related to the Windows Registry. This pertains to removing the UpperFilters and LowerFilters registry values. Microsoft has aknowledge base article on how to do this.
  •  

Further useful programs to deal with USB problems are USBDeview, which is a freeware utility to view USB devices, and USB View from Microsoft. They show a lot more about your USB devices than the Device Manager does, so they can be helpful to pinpoint problematic USB devices. The USB View program from Microsoft has the advantage that it shows the hierarchy, so you can see which device is connected to which USB Controller and USB Hub. But the program is part of the Microsoft development tools, so unless you can find a reliable individual download, you need to install complete development environment.


Most USB device not recognized errors can be solved with one of the above solutions. If you have any other solutions, or a USB problem that did not get solved using these tips, please leave a comment and I’ll get right on it!

Read More

Wednesday, September 28, 2011

bench3

11 Effective Ways To Increase Your PC Performance

Here are the ten simple steps that will help improve the speed and performance of your Personal Computer.

There’s so much information out there in bench3 about PC performance (especially on Windows machines), it’s difficult to be sure what’s right and what’s not so helpful. Here are 10 proven performance enhancements you can make to your computer, many of which are free.

Stay Away From Malware:

New machines shouldn’t have malware on them. But one of the most common causes of slow PC complaint is actually the presence of malware.

Malware can sneak onto a computer in a zillion different ways and quite often it sits in the background slowing your machine to as it sends out spam emails, searches for other computers to infect, works on cracking cryptography, or any number of the other nefarious tasks that hackers like to use their botnet slaves for.

There’s a good chance that the malware brought even more friends with it (that’s often how you see computers with thousands of viruses on them not long after the initial infection), and the infection may be bad enough to justify a wipe and reload. My first step in investigating a slow system is usually a virus scan.

Keep Your Windows Drivers Up-to-Date:

Do you know that all your hardware has a supporting driver, and the hardware manufacturer often release a better driver for the hardware. And the best way to make your hardware work good is to support it with the most recent and updated drivers for them.

Upgrade to a better video card

For typical business productivity tasks, a video card probably isn’t an upgrade that will have a lot of value. But for gamers and other similar uses, a video card is a slam dunk upgrade. If your current card and motherboard support SLI or CrossFireX, adding a second card and bridging them will be a good option as well. In some scenarios, better video cards can be a huge benefit even without heavy onscreen video work, because certain applications can leverage the GPUs for calculations.

11 Effective Ways To Increase Your PC Performance

Get a faster drive

Many times, the real performance issue is the speed of disks. Look at numbers like the RPMs, cache size, seek speed, and transfer rate to buy a faster drive. Often, a good drive will seem slow because the computer’s power settings are allowing it to spin down. You may want to consider changing these settings to make sure that the disk is more likely to be ready to work when you need it to. While the SSD vs. hard disk debate is still continuing, SSDs usually seem to feel faster to users. Boot times are usually cut for sure. But something about an SSD makes a system feel more responsive or “snappy” to use, and for day-to-day work, that’s a great feeling.

Address hardware and driver issues

All too often, system slowness is actually a sign of hardware problems. For example, if your CPU isn’t being properly cooled, it will often have its speed reduced in an effort to keep it from overheating. Recoverable errors with disk access can kill your throughput while not showing up as a dead drive. And bad hardware drivers can often make the whole system slow, especially video drivers. Using utilities to check your CPU speed and various temperatures, scanning for hard drive errors, and updating your drivers is a good start to investigating performance problems. Often, problems caused by hardware or drivers are not just poor speeds, but system flakiness too.

Use a RAID

Using a RAID can dramatically lower the read and write speeds of your disks, depending upon the RAID level you choose. You will want to do some research to see what RAID level fits your needs the best. Personally, I am a fan of RAID 1, 6, and 10 because I feel that they offer appropriate levels of data protection along with a good measure of speed improvements.

Try a different browser

It’s no secret: Different browsers perform differently, and most people spend a lot of time in their Web browser. Benchmarks really muddy the browser speed conversation. Some browsers perform well on some but do badly on others, even when they are supposed to test the same thing. The problem with the benchmarks is that what they usually test is not real work performance! While JavaScript is an important part of the modern Web, few Web applications beat on the JavaScript engine hard enough to produce a noticeable impact on performance. That said, it’s been my experience that the Chrome browser is the fastest for actual work. If you want to have your Web browser feel more responsive and lively, consider a switch to Chrome.

    Remove junk

    It’s easy to have a computer get loaded up with junk that slows it down. The worst part is, we invite this garbage into our lives by installing “helpful” utilities, toolbars, and other add-ons. I could easily write a list of 10 kinds of computer-stalling junk. Here are some of the things you’ll want to seek out and remove for best performance:

    • Automatic update systems for various applications (but be careful: some apps, like Flash, Acrobat, QuickTime, and Web browsers are prime malware targets and you will want to keep these up-to-date)
    • Things that run on startup
    • Windows services you don’t really need
    • Crapware from the PC maker
    • Toolbars
    • Browser plug-ins (the Skype browser plug-in is an especially bad offender, I’ve found)
    • P2P applications
    • Web servers and database servers that were installed by since-removed applications, but left behind

      Add a faster DNS lookup server

      Most ISPs love to brag about how much bandwidth they are giving you. But they don’t mind letting the rest of their infrastructure slowly get overwhelmed or deteriorate. Among the biggest offenders are the DNS servers our ISPs use. If you want to know why things seem to take forever to start loading, slow DNS servers are often the cause. Consider adding a fast DNS server as your primary DNS server in your TCP/IP settings. Google’s Public DNS server is a great option.

      Defrag

      Defragging your hard drives is a great way to get some more performance. While modern Windows systems automatically defrag on a regular basis, I’ve found that the Windows defragging is fairly unaggressive. So, we recommend that you make your PC to perform defragmentation at regular interval.

      Check network connectivity

      Time and time again, “system slowness” actually is caused by networking issues. Our computers do so much on the Internet that slowness there can affect just about everything you do on a regular basis. While there isn’t enough space to write an exhausting troubleshooting list here, some of the things you should try (or investigate) are:

    • Replacing the network cables, switches, routers, WiFi access points, etc.
    • Calling the ISP and checking the distance from the CO (for DSL) or the local segment’s current load (for cable); the ISP may need to rewire or rework its connectivity. Satellite customers will want to double-check their dish installation and ensure that it is tightly locked down and pointed in the right direction.
    • Malware scanning on all PCs to see if malware is burdening the network
    • Inspecting the wiring of the phone lines (for DSL) or coax (cable customers) to look for loose connections, corrosion, or flaky wires
    • Cable customers will want to find out how many splitters are between the line from the pole and their modem. If it is more than one (and preferably only a two-way splitter), they should rewire so that they have only a single two-way splitter between the pole and the modem to ensure the cleanest signal possible.

        These are the 11 ways that will make your system work as fast as it worked when you purchased it. And one more bonus tip that I have not discussed here is, keep your Windows up-to-date. As what I have discussed above, some applications, like Flash, Acrobat, QuickTime, and Web browsers are prime malware targets and you will want to keep these up-to-date.

        And it is recommended that you configure your windows to install updates automatically at some specific time when it is available.

    Read More

    Wednesday, August 10, 2011

    bench3

    Fix Sound and Audio Problems On Windows 7

    No Sound after upgrading to Windows 7: If you have recently upgraded from XP to Windows 7, you will face similar situation that you will no longer hear anything from your Windows 7 machine. Well, even though you can able to move the sound indicator and the volume icon will still be visible to you on the task bar. This issue could be because the old sound device was not supported by Windows 7.

    Even the device manager will not hint any problems with your devices. If this is your case you can try to troubleshoot them by following the below steps.

    1. Let's make sure that your playback devices are enabled.

    • Right-click the speaker icon on your taskbar > Select 'Playback Devices'
    • In the empty space, Right-click and select both 'Show Disconnected/Disabled Devices'
    • Do you see icons for your speakers and headphones now?  You may need to enable both of these.

    2. Try the trouble-shooter to discover any connection issues that may exist, instructions are below:

    • Click 'Start' > Select 'Control Panel'
    • Type troubleshooting in the top-right search field > Select 'Troubleshooting'
    • Click 'Hardware and Sound' > Select 'Playing Audio'
    • Please comment to this post to let us know if this did or didn't help to resolve your problem. Cheers!

    In case if Windows 7 does not detect your hard ware, then trouble-shooter will just pass on a command that tells you need to connect peripherals to the I/O sockets. If this is the case for you, it is because the issue is related to the old sound card that did not support windows 7, I would suggest going to your sound card's manufacturer website and downloading the latest driver may fix the issue.

    If you can able to get the latest driver from the manufacturer website, hopefully after successfully installing them, your speakers will once again be recognized by Windows 7

    If you are already working fine with sounds and music on Windows 7, and in cause if you recently lost sound in Windows 7, reinstalling your audio driver for the motherboard will fix the issue.

    Please comment to this post to let us know if this did or didn't help to resolve your problem. Cheers!

    Read More

    Monday, August 8, 2011

    bench3

    Fix Printer Spooler Problems In Windows 7

    Printer spooler is one of the software programs, which is responsible for managing all printing jobs in your system and taking print outs in an efficient way. Printer spooler sends the printing request to the computer printer or to the print server. The printer spooler program also helps in deleting the print jobs being processed besides also managing print jobs currently waiting to be printed in the printer.

    In addition, the printer spooler also allows user to schedule a printing job to be carried out in the system. It then transfers messages from the system to the printer for taking the print outs. Several times, the printer spooler may face certain problems and result in the complete failure of the printing process. One of the main issues caused in the Windows 7 printer spooler software program is due to incompatibility of the Operating System.

    Printer spooler issues arise when the printer is not compatible with the Operating System. It would then result in the failure of the printing process in the system. You could fix the issue by checking whether the printer is supporting the Operating System or not. If it is not supporting then you have to install the correct printer drivers from website. This would resolve all compatibility issues.

    Unless a printer is added to a system and the printer spooler correctly recognizes the printer, it will not be able to carry out the printing jobs. This happens when other printers, before the actual printer, is installed in the system. You could fix the issue by starting the computer in the safe mode. When you power on the system, you need to move to the ‘Windows advanced option’ by pressing the ‘F8’ key and then selecting the safe mode option from there. By doing that you would be able to delete previously installed printer files.

    Possible Error Message In Windows 7: Error 1053, printer spooler-service does not work. And if your Printer is not compatible with Windows 7, Changing the print services to automatic and rebooting will not work. You can also try to restarting the print spooler by restarting it from the services.

    Fix Printer Spooler Problems In Windows 7

    Printer spooler errors

    There are chances that printer spooler in the system would show errors. This is due to very high CPU use. The documents in the queue would not print or delete. This would lead to lock ups, slow system performance, and disk space errors etc. The printing process would thus fail.

    You could fix the issue by downloading the printer spooler repair tool, which is called as ‘PC Health Advisor’. You might also need to save the software file in your system and run the software for fixing the printer spooler errors.

    Read More

    Wednesday, August 3, 2011

    bench3

    Fix The Annoying Beep Sound While Typing In Windows

    If you have problem in your Windows like, Sound does glint when ever you type or hold some key on your keyboard. Here is what one of our friend have reported about the problem:

    First noticed when listening to a video on YouTube and wanted to search for another video. I started typing what the next video's title and while typing this the sound out of nowhere became choppy. It would be fine as long as I don't type but as soon as I begin entering text it would start getting choppy. I'm at a standstill of what to do.

    Solution: Make sure you have updated all your drivers both for internal devices and external devices. And, this should not be a system issue but a performance issue. The beep can be caused if system is busy and cannot response to the key press.

    Try to change the Keyboard on your system. just try to borrow one from your friend and check if that works.

    First we can try a Clean Boot. Please refer the steps:

    • Click Start, type msconfig in the Start Search box, and then press ENTER. If you are prompted for an administrator password or for a confirmation, type the password, or click Continue.
    • On the General tab, click Selective Startup.
    • Under Selective Startup, click to clear the Load Startup Items check box.
    • Click the Services tab, click to select the Hide All Microsoft Services check box, and then click Disable All.
    • Click OK.
    • When you are prompted, click Restart.
    • After the computer starts, check if the issue is fixed.

    If your issue is resolved after performing Clean Boot, then follow the steps mentioned in the following KB article to narrow down the exact source:

    http://support.microsoft.com/kb/929135

    Also, see the section on how return your computer to a Normal startup mode by following the steps under “Reset the computer to start as usual”, after performing the clean boot troubleshooting.

    I also suggest you to temporarily disable the sound card, and check if the problem still exist.

    http://windows.microsoft.com/en-US/windows7/Fixing-game-performance-problems

    Read More

    Sunday, July 31, 2011

    bench3

    Display Driver Stopped Responding And Has Recovered | How To Fix Error

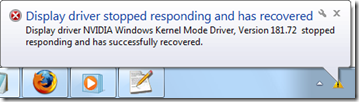
    Running Windows 7 some times make your display off and on as you get a error message that “Display Driver Stopped Responding And Has Recovered”.

    You will come across a short system freeze, a short blackout and after that every thing will start to work as normal. but you will get a small pop up command (as shown in the below screen shot) near the clock saying that “display driver stopped responding and has recovered”.

    OK, one of the best and suggested solution of display driver problem is, to downloaded the most current driver from the company's Web site.  And to check if there is any update from your device (Mother board) manufacturer.

    Display Driver Stopped Responding And Has Recovered  How To Fix Error

    Possible Solution:

    Make sure you've got latest drivers. If you are using 64Bit Operating system make sure you have the driver that supports 64Bit Computing.

    Before installations of new driver remember to uninstall old one first.

    If you are sure that you have updated drivers and everything is fine with your device, then another possible reason may be, the motherboard is overheated. Normally there will be Blue Screen Of Death (BSOD) as shown in the below screen shot but most of the time, Windows 7 react on that problem by resetting graphic card.

    Display Driver Stopped Responding And Has Recovered  How To Fix Error 2

    Check Your CPU temperature with some third party software's like Lavalys Everest or HwMonitor. If temperature were too high use compressed air and clean out all the vents with force air. Laptop must be switched off and remove the battery before trying this out.

    Minimum once per year I always recommend manual clean of heat sink and fan. You may try to do it also if compressed air won't help.

    How to do it check Your service documentation if it's available on your Manufacturer site.

    Warning! Do manual Service on your computers and Laptop only on your own risk and if you know what you are doing and also if your product is not supported by Warranty. If You still have warranty don't clean it manually on You will loose your loose your warranty.

    Read More