Showing posts with label ShellCommand. Show all posts

Tuesday, April 26, 2011

bench3

Pin To Start Menu And Task Bar For Default User

There are many possibilities to pin items to the start menu and task bar for the default user in windows 7 so that when a new user logs on, they have what’s been customized. 

The setting the Copy Profile to true doesn't seem to catch these customizations. I've been able to use the CopyProfile command to keep items that I've pinned to the Start Menu, but not the things that I've pinned to the Taskbar.

However, you can define up to five things that you want everyone to have pinned to their Taskbar using the unattend.xml files...that's one way of getting things there, unfortunately, that does not get rid of the "default" MS items that are already there (IE, MediaPlayer, etc).

Here's a way to do it using a script though:

http://blogs.technet.com/deploymentguys/archive/2009/04/08/pin-items-to-the-start-menu-or-windows-7-taskbar-via-script.aspx

You could in theory also configure these things using Group Policy Preferences.  There are two components to the Taskbar items, one is a registry key and the other is a file system shortcut.  The registry keys define what is there and in what order the items appear on the taskbar.  If you use GPP you could set both of those things up for all new profiles.

However, I'm leaning towards using the script and something like Active Setup which will allow you to run a one-time command for every new user that logs in to a box.  That way I can remove the things I don't want and add in the ones that I do...

Surely Microsoft should be able to come up with a better way of customizing the taskbar and start menu for users.

Read More

Friday, September 17, 2010

bench3

Compressed (Zipped) Folders In Send To Options | Customizing Send To Options In Windows

By default you will find Compressed (Zipped) Folders when ever u right click any file or folder and choose "Send To".
And what to do if you do not have an option of Compressed (zipped) folder command ? Or what if you want to get rid (delete) any other option of sending such as Blue Tooth Devise...

In Windows Vsita / Windows 7, the items related to "Send To"  Are stored In the following location. 
C:\Users\%username%\AppData\Roaming\Microsoft\Windows\SendTo

For Windows XP the folder will be in 
C:\Documents and Settings\%username%\SendTo

Also you can manually delete the entry that you dont want to display in Send To Options, for example, Bluetooth device.
Read More

Thursday, August 19, 2010

bench3

Quickly Get To Commant Promt From Windows Explorer Or My Computer

If you find yourself using the Command Prompt frequently, you’ll probably benefit from the following solution. Instead of having to use the cd command to change to a given folder, you can simply open a Command Prompt window on the fly in Explorer, already rooted in the selected folder. 
Important This section, method, or task contains steps that tell you how to modify the registry. However, serious problems might occur if you modify the registry incorrectly. Therefore, make sure that you follow these steps carefully. For added protection, back up the registry before you modify it. Then, you can restore the registry if a problem occurs. For more information about how to back up and restore the registry, How to back up and restore the registry in Windows -  Backing Up And Restoring Individual Registry Entries In Registry Editor
  • Open the Registry Editor.
  • Expand the branches to HKEY_CLASSES_ROOT\Directory\shell.
  • Create a new key by going to Edit – New - Key, and type cmd for the name of this new key.
  • Double-click the (default) value in the new cmd key, and type the following for its contents: Open Command &Prompt Here
  • Next, create a new key here by going to Edit – New - Key, and type command for the name of the new key.
  • Double-click the (default) value in the new command key, and type the following for its contents: cmd.exe /k "cd %1 && ver" This line launches the cmd.exe application, and then, using the /k parameter, instructs it to carry out these two commands:
        cd %1
        ver
which change the working directory to the folder that has been right clicked, and then displays the Windows version, respectively.
  • Close the Registry Editor when you’re done; the change will take effect immediately. Just right-click any folder and select Open Command Prompt Here to open a Command Prompt window at the selected folder.
A simpler and somewhat slicker solution is to use Creative Element Power Tools. Once you turn on the Open a Command Prompt in any folder option, you can right-click any folder icon or the background of any open folder window (or the desktop), and select Command Prompt to open a new Command Prompt window rooted at the selected folder. The tool supports Administrator mode (for UAC) and can also be configured to open the Windows PowerShell (covered next) or any third-party Command Prompt application.
Read More

Wednesday, June 23, 2010

bench3

Understanding Shell and System Locations In Windows 7

On the right side of the Start menu, you’ll see a list of commands that are vaguely similar to what appeared on the XP and Vista Start menu. However, if you’re coming from XP, many of the names have changed. For example, the old My Documents link has been replaced by one named Documents, My Pictures is now Pictures, My Music is now Music, My Computer is now Computer, and My Network Places is now Network. There are some new items, too, as well as some missing items that were present in XP. 

At the top of the right side of the Start menu, you will see a link that has the same name as your user account. For example, if you’re logged on as Haja, the first link on the right side of the Start menu will also be named Haja. When you click this link, it opens a Windows Explorer window displaying the contents of your user folder, which is found in C:\Users\Your Username, by default. 

This folder contains folders such as My Documents, My Pictures, My Music, and so on. It’s unclear why you would ever need to access this folder, except in rare circumstances. For this reason, you may simply want to remove it from the Start menu and replace it with a more frequently needed command (like Videos).

The Games link debuted in Windows Vista and opens the Games Explorer, which provides access to both games that came with Windows and those you might purchase separately. One feature some people might miss with the new Start menu is the ability to quickly cause the system to shut down, restart, sleep, or hibernate using just the keyboard. 
In Windows XP, you could tap the Windows key, press U, and then U for shut down, R for restart, S for sleep, or H for hibernate (the latter of which was a hidden option). 
Because of the Start Menu Search feature in the Windows 7 Start menu, these shortcuts no longer work. However, you can still perform these actions with the keyboard in Windows 7. 

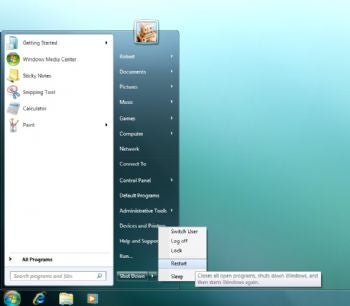
Now, however, you have to tap the Windows key and then press the Right Arrow key three times to display the submenu shown in Figure below, which provides links to the aforementioned options as well as Switch User, Log Off, Lock, and, if you have a notebook computer with a docking station, Undock. The default option— on the button, not the menu—is shut down.
In Windows XP and Vista, some of these links pointed to special shell folders, special physical folder locations that were reserved for specific purposes. In Windows 7, these links no longer point to special shell folders; they point instead to Libraries, a new Windows 7 feature. From a usage standpoint, Windows 7 Libraries work similarly to special shell folders from previous Windows versions. 

Options related to shutting down, sleeping, and locking the PC are available via this mini pop-up menu. 
Notice that this menu is, alas, a pop-up menu similar to the All Programs menu in Windows XP. Why Microsoft killed pop-up menus in one place but added them in another is a mystery.
Read More

Wednesday, November 25, 2009

bench3

Easy Ways To Get To Your Desktop In Windows | Make A Show Desktop Button

If you have to reach over a pile of papers just to reach your keyboard, then you’re the type who likes surfaces. The Windows desktop is no exception, and yours is probably full of files you need. Problem is, they’re always underneath everything else.

Here are some ways to get to the stuff on your desktop without much hassle: Minimize everything Hold the Windows logo key (which we’ll call Winkey, just to be cute) and press D to quickly show the desktop. Press Winkey-D again to restore your windows (although not necessarily in the same sequence). Do this many times to give yourself a headache.

Show Desktop
Don’t want to use the keyboard? Just locate the Quick Launch toolbar, the little row of tiny buttons on the far left of your taskbar, and click the Show Desktop button (the blue rectangle in Figure).


Figure: Use this handy button to show the Windows desktop without having to manually minimize all your windows. Give the button another click to restore the windows.

If the Quick Launch toolbar isn’t there, right-click an empty area on your taskbar and go to Toolbars ➝ Quick Launch. If you don’t see the Show Desktop button, it may be buried inside the tiny white arrows; otherwise, see the “Make a Show Desktop Button” sidebar for tips.

You can also right-click an empty area of the Taskbar, and select Show the Desktop to do the same thing as the button. Then, to restore your windows, right-click the taskbar again and select Show Open Windows.


Make A Show Desktop Button Using Shell Command

By default, the Quick Launch toolbar comes with a Show Desktop button, which allows you to quickly hide all open windows and access stuff on your desktop, and then quickly bring them all back when you’re done. But what if your Quick Launch toolbar doesn’t have one?

Unlike most other toolbar buttons, the Show Desktop button isn’t a Windows Shortcut. Rather, it’s a Shell Command File (.scf), which is really just a plain-text file containing a special command Windows understands. To create a new .scf file, open your favorite plain-text editor (or Notepad), and type the following five lines:
[Shell]
Command=2
IconFile=explorer.exe,3
[Taskbar]
Command=ToggleDesktop

Save the file as Show Desktop.scf (or any other name, provided that you include the .scf filename extension) anywhere you like, including your desktop. To have the icon appear on your Quick Launch toolbar, place the file in this folder(In Windows Vista And Windows 7):
C:\Users\{user}\AppData\Roaming\Microsoft\Internet Explorer\QuickLaunch
And For Windows XP Users, place the file in this folder:
C:\Documents and Settings\%username%\Application Data\Microsoft\Internet Explorer\Quick Launch

If you like the Show Desktop button, but you don’t like the clutter of the Quick Launch toolbar, you can simply eliminate the buttons you don’t use by right-clicking each one and selecting Delete.

Next, right-click an empty area of the Taskbar, turn off the Lock the Taskbar option, and then shrink down the newly sanitized Quick Launch toolbar so it’s no larger than the remaining button, like the example in Figure above. When things are the way you like them, turn Lock the Taskbar back on.

Open Windows Explorer
Another approach is to simply open a Windows Explorer window and navigate to the Desktop folder at the top of the tree. That way, you can leave your open programs intact, making it easier to drag files onto them from the desktop.

You can also drag files onto a minimized application, provided you have a steady hand and some patience. Just drag down to the taskbar and hover the file over the minimized application button you want to restore. Although you can’t drop files on the buttons themselves, if you wait a second or two, Windows will restore the application window, at which point you can drag the file over to the window and drop it.

Icons On The Taskbar
Right-click an empty area of the taskbar, select Toolbars, and then select Desktop. By default, the toolbar will probably be smushed up against the notification area (tray) and the clock, so right-click the taskbar again and turn off the Lock the Taskbar option so you can move the Desktop toolbar around. Next, right-click the Desktop title and select the Show Text option to fit more icons on the bar. It’s not the most convenient interface, especially if you have a lot on your desktop, but it’s there if you need it.
Read More